Why Taking Screenshots on Android Is Essential
In today’s digital world, knowing how to take a screenshot on Android is a practical skill every smartphone user should master. Screenshots allow you to instantly capture and save everything from important messages and social media posts to app instructions and high scores. Whether you want to share something with friends, keep a record of a conversation, or report an issue to customer support, screenshots offer a quick and efficient solution.
With so many Android devices and manufacturers, the method to take a screenshot can vary. However, Android has standardized many functions, making it easier than ever for users to capture their screens in seconds. This comprehensive guide covers all the best and most effective methods, ensuring you’ll never miss capturing a vital moment.
Method 1: Using Hardware Buttons (Standard Way)
Step-by-Step Instructions for Most Devices
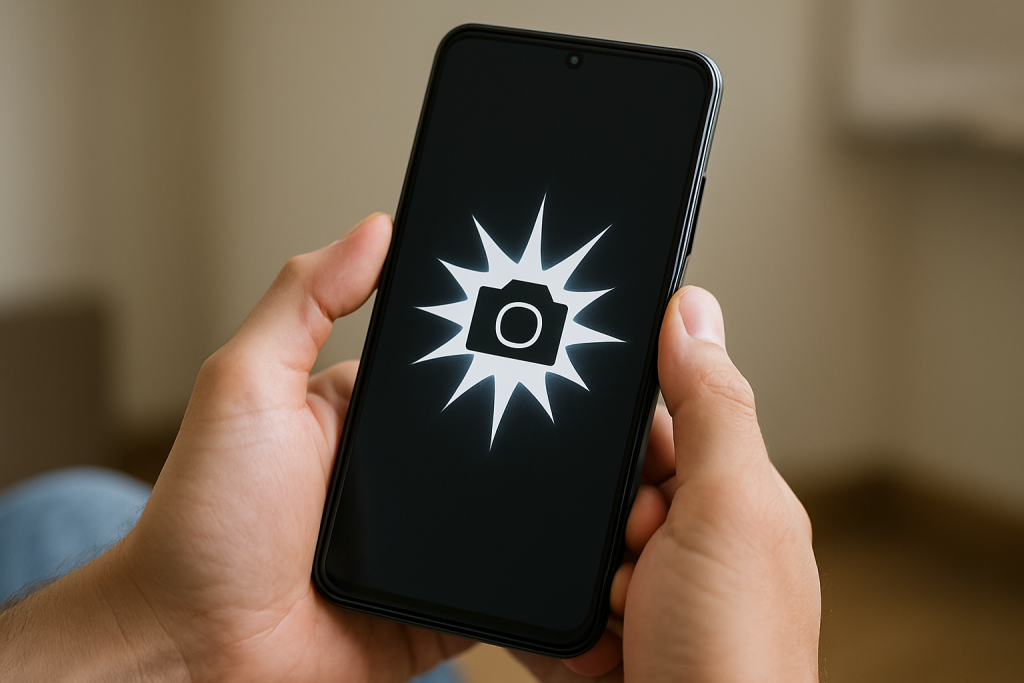
The most common and fastest way to take a screenshot on Android is through the combination of physical buttons. Here’s how it works on nearly every modern Android phone or tablet:
- Navigate to the screen you want to capture.
- Press and hold the Power and Volume Down buttons at the same time.
- Hold both buttons for about 1-2 seconds until the screen flashes or you hear a shutter sound.
This method works for most Samsung, Google Pixel, OnePlus, Motorola, and Xiaomi devices. You’ll usually see a preview or notification pop up, allowing you to quickly view, edit, or share the screenshot.
Tips for Perfect Button Timing
Sometimes, it can take a few tries to get the timing right. Pressing the buttons simultaneously is key—if you press one before the other, it may trigger a different action, such as adjusting the volume or bringing up the power menu. Practice until you get a smooth capture every time.
Method 2: Using Gestures and Shortcuts
Popular Gesture Features on Android Phones
Many Android devices now include gesture-based screenshot options. These allow you to take a screenshot without pressing any physical buttons. Here are some manufacturer-specific examples:
- Samsung Galaxy: Use “Palm Swipe” by sliding the edge of your hand across the screen from left to right.
- OnePlus: Swipe three fingers downward on the screen.
- Huawei/Honor: Knock the screen twice with your knuckle.
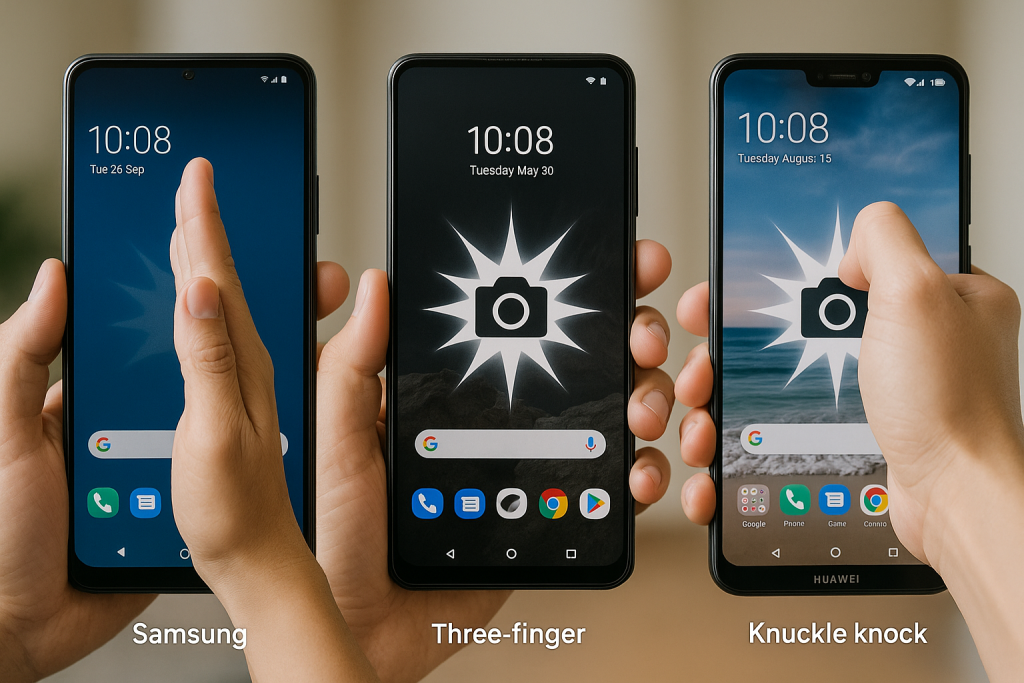
These settings are often turned on by default, but you can enable or customize them in your phone’s Settings menu under Gestures or Advanced Features.
How to Enable Gesture Screenshots
To activate or change gesture-based screenshot controls:
- Open your device’s Settings.
- Go to Advanced Features, Motions and Gestures, or similar.
- Find and enable “Screenshot by gesture” or the appropriate option.
Test the gesture to ensure it’s working, and adjust sensitivity if needed for the most reliable results.
Method 3: Using the Quick Settings or Notification Panel
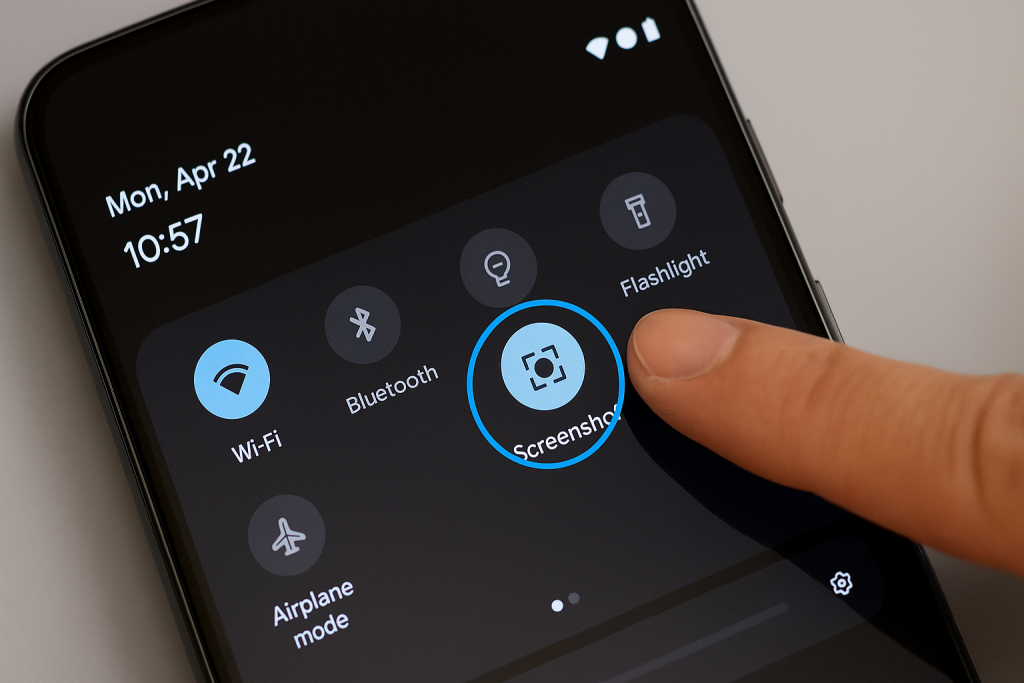
Accessing Screenshot from the Quick Settings
Another fast method is through the Android Quick Settings or Notification Panel. This is especially useful if your hardware buttons are faulty or difficult to use.
Here’s how to use this method:
- Pull down the Notification Panel or Quick Settings by swiping down from the top of your screen.
- Look for the Screenshot or Capture icon.
- Tap the icon to capture the current screen.
Customizing the Quick Settings Menu
If you don’t see the Screenshot option, you can often edit your Quick Settings:
- Tap the pencil or “Edit” icon in the Quick Settings menu.
- Drag the Screenshot tile into your active Quick Settings area.
This makes taking screenshots even more accessible with just a swipe and tap.
Method 4: Google Assistant and Voice Commands
Taking Screenshots Hands-Free
Google Assistant provides a hands-free way to take screenshots, perfect when your hands are full or your buttons aren’t working.
To use Google Assistant to capture your screen:
- Navigate to the screen you wish to capture.
- Say “Hey Google, take a screenshot.”
- Google Assistant will capture your current screen and offer sharing or saving options.
Limitations to Note
Some apps (especially banking or streaming apps) may block screenshots for security reasons, even with Google Assistant. In such cases, try another method or review app permissions for screenshots.
Method 5: Using Third-Party Screenshot Apps
Advantages of Screenshot Apps
If you need advanced features like scrolling screenshots, annotation tools, or automatic cloud backup, consider using a third-party app. These apps can offer more flexibility and features than the built-in Android screenshot function.
- Screen Master: Offers powerful editing, long screenshots, and sharing options.
- Screenshot Easy: Allows screenshots from notification bar, floating button, or by shaking your device.
- LongShot: Specializes in capturing scrolling content and full web pages.
How to Use a Screenshot App
Download your chosen app from the Google Play Store, follow the on-screen setup instructions, and grant necessary permissions. These apps typically add a floating button or icon, enabling you to take screenshots with just a tap, regardless of what’s displayed on your screen.
Method 6: Capturing Long or Scrolling Screenshots
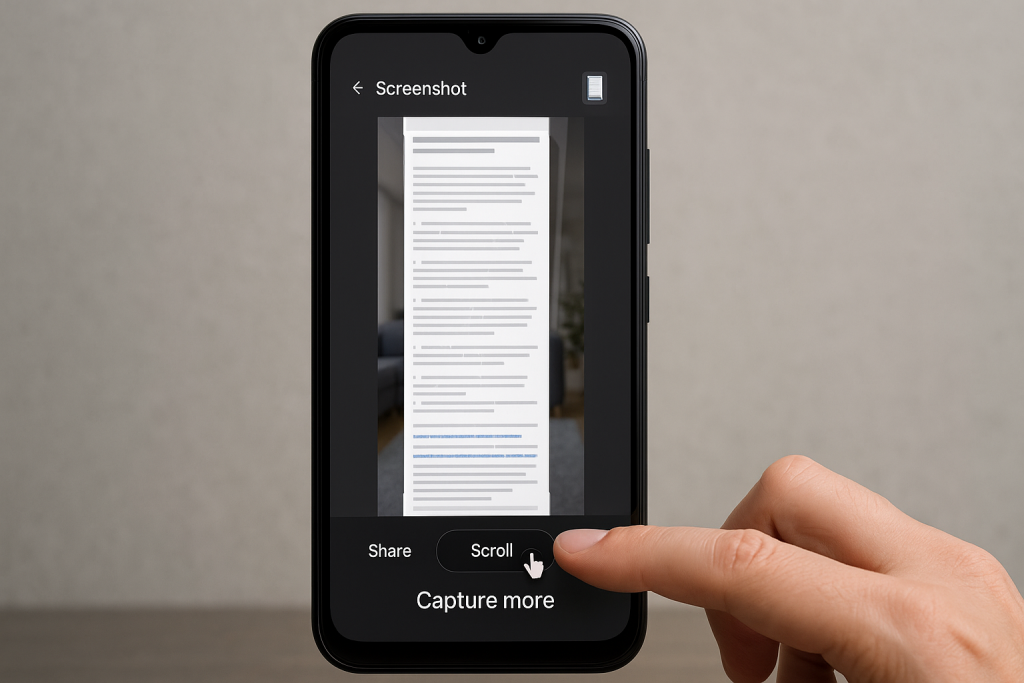
Built-In Scrolling Screenshot Features
Many Android devices now support capturing long or scrolling screenshots, perfect for saving entire articles, chats, or web pages.
- Take a standard screenshot using your preferred method.
- When the screenshot preview appears, tap the Scroll, Capture more, or Scrollshot button.
- Continue scrolling and capturing until you’ve included the full content.
Devices and Apps That Support Scrolling Screenshots
Samsung (One UI), Xiaomi (MIUI), and Motorola (My UX) are among the brands supporting this feature natively. If your phone doesn’t offer it, third-party apps like LongShot or Screen Master provide similar functionality.
Method 7: Taking Screenshots on Older Android Devices
Alternate Methods for Android 4.0 and Below
If you’re using an older Android device, the screenshot process may differ. On some devices, try:
- Power + Home buttons: Press and hold simultaneously.
- Hold Power button: Some devices show a screenshot option in the shutdown menu.
- Check your device’s user manual for manufacturer-specific shortcuts.
Using Computer Software
For very old devices with no built-in screenshot option, consider using Android desktop utilities like ADB (Android Debug Bridge) or third-party PC software to capture your device’s screen via USB connection.
Where to Find and Manage Your Screenshots
Locating Saved Screenshots
By default, Android saves screenshots to the “Screenshots” folder in your device’s Gallery or Photos app. Open the app and look for this folder to find, edit, or share your captures.
You can also use a file manager app to navigate to Internal Storage > Pictures > Screenshots.
Editing and Sharing Your Screenshots
After taking a screenshot, most devices allow instant editing—crop, annotate, or add text—before saving or sharing. This helps you quickly highlight important details or cover personal information.
Sharing is easy from the screenshot’s preview window or directly from your gallery. Tap the Share icon and select your preferred app to send images via email, chat, or social media.
Troubleshooting Common Screenshot Issues
What to Do When Screenshots Don’t Work
If your screenshots are not saving or the button combination doesn’t work, try these solutions:
- Restart your device to clear any temporary glitches.
- Check if your phone’s storage is full and free up space if necessary.
- Ensure you’re pressing the correct button combination and timing it right.
- Update your device to the latest software version for improved compatibility.
App Blocking Screenshots
Some apps, especially those handling private or secure information like banking, block screenshots for privacy. In these cases, try a different method or use a screenshot app with advanced permissions, keeping in mind ethical and legal guidelines.
Pro Tips for Better Android Screenshots
- Clean your screen before capturing to avoid showing fingerprints or smudges.
- Turn off notifications or enable Do Not Disturb to avoid unwanted pop-ups.
- Keep your phone’s software updated for the latest screenshot features.
- Explore built-in editing tools for quick enhancements after capturing.
Conclusion: Capture, Save, and Share with Confidence
Mastering the art of taking screenshots on Android gives you the power to save important information instantly and share it with others anytime. Whether you prefer button combinations, gestures, Google Assistant, or third-party apps, these 7 proven methods ensure you’re ready for any situation. Practice the techniques, try out advanced features like scrolling screenshots, and troubleshoot any issues with confidence. With these tips and tricks, you’ll become a screenshot pro in no time!