A great frame does more than hold a photo. It sets mood, adds texture, and helps a room feel finished without requiring a big decorating budget. These diy picture frame ideas are built for real homes: apartments with limited tools, family rooms full of snapshots, dorm walls that need personality, and gallery walls that need one-of-a-kind detail. Most projects use easy-to-find supplies from craft stores, thrift shops, hardware stores, or items already sitting in drawers.

Introductory illustration
Before choosing a project, think about where the frame will hang, what it will hold, and how much wear it may get. A lightweight paper frame works beautifully for a home office print, while a wood picture frame is better for a hallway, mantel, or family photo wall. The best handmade photo frames balance style, safety, and durability.
Best DIY Picture Frame Ideas for Every Home Style
The right frame idea depends on your decor style. Farmhouse spaces often look best with reclaimed wood, distressed paint, or burlap details. Modern homes benefit from clean lines, matte black finishes, floating acrylic, or simple natural wood. Boho rooms can handle woven texture, beads, dried flowers, painted patterns, or colorful fabric. Minimal spaces need restraint: thin frames, neutral mats, and subtle finishes.
For a polished result, repeat one design element across several frames. Use one color family, one wood tone, or one mat style. This keeps creative frames from looking messy when grouped together. If you want a collected look, vary frame sizes but keep spacing consistent.
Simple Wooden Frame Projects
Wood remains one of the most versatile materials for homemade picture frames. It feels warm, works with almost every interior style, and can be stained, painted, sanded, or left raw. For beginners, square dowels, lattice trim, or pre-cut craft wood strips are easier than cutting heavy lumber.
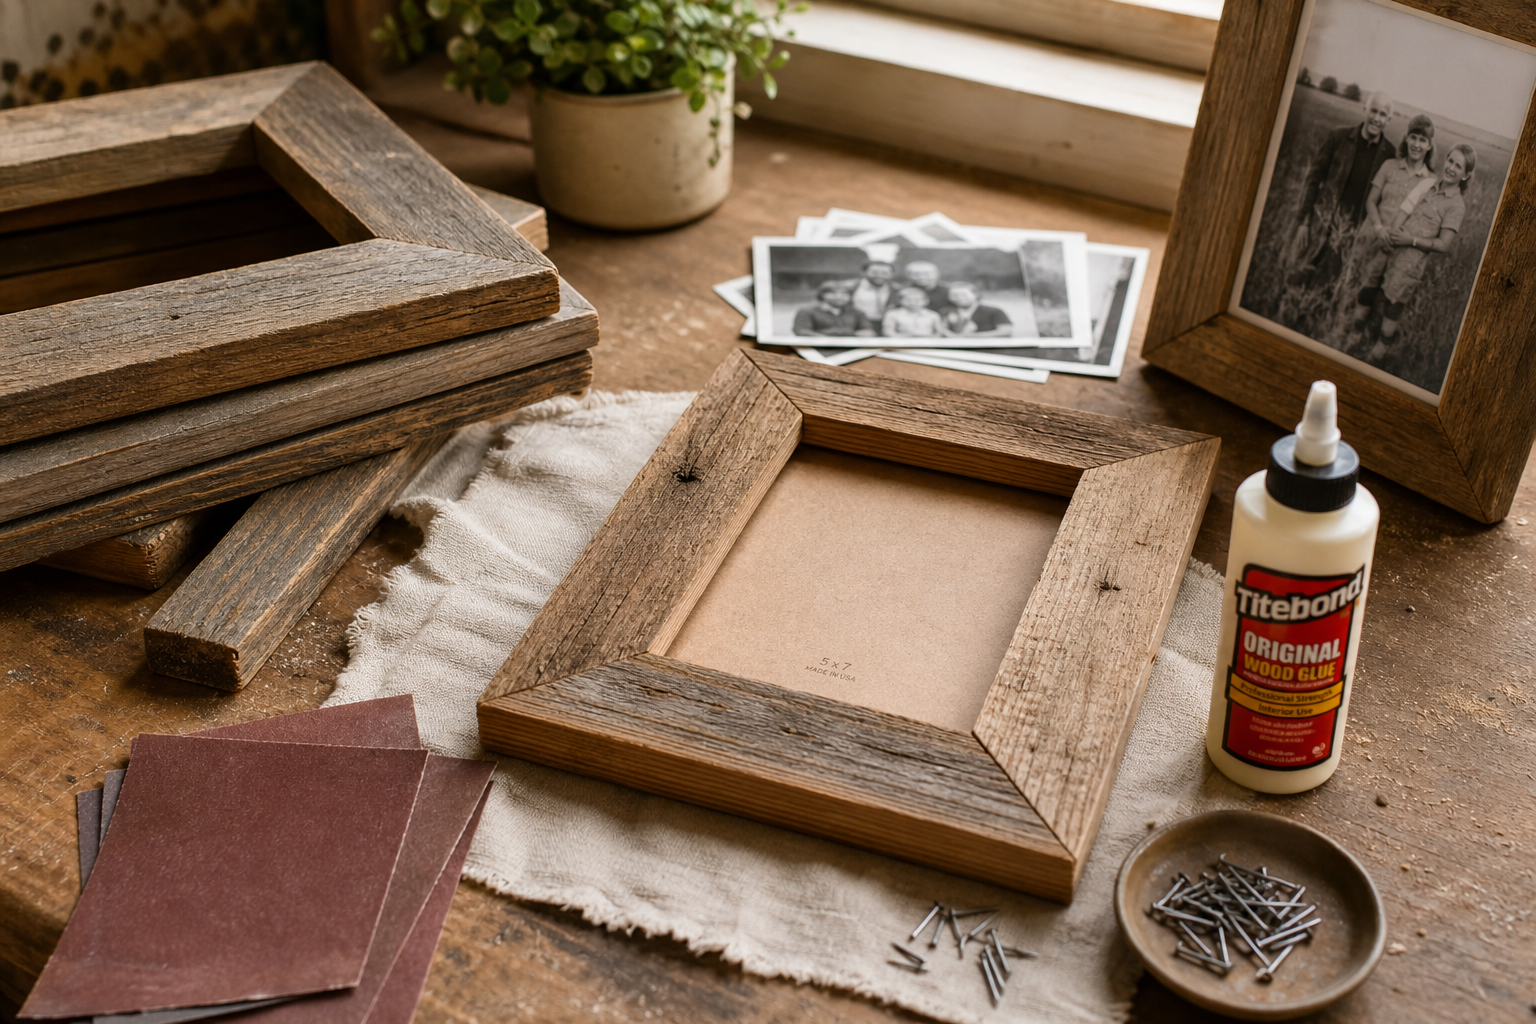
Rustic Reclaimed Wood Frame
Reclaimed wood gives instant character to family photos, black-and-white prints, and landscape photography. Look for old fence boards, pallet wood marked safe for indoor use, or leftover planks from home projects. Sand rough edges, wipe away dust, then cut four pieces to fit around your photo backing. Mitered corners look classic, but straight butt joints also work well for rustic decor.
Attach pieces with wood glue and small brad nails. Add a cardboard or thin plywood backing, then secure photo with photo corners or acid-free tape. Finish with clear matte sealer if you want natural texture, or use walnut stain for deeper color.
Minimal Dowel Frame
A dowel frame works well for posters, art prints, pressed botanical pages, or kids’ artwork. Use two round or half-round wooden dowels at the top and bottom of the print. Sandwich paper between two dowels using strong craft glue or magnetic strips, then add cotton cord for hanging. This easy picture frame alternative feels modern and costs very little.
Painted Wood Frame Refresh
Thrift store frames can become custom decor with paint. Remove glass and backing, clean the frame, then sand glossy surfaces lightly. Spray paint gives smooth coverage, while chalk paint creates a softer handmade finish. For a high-end look, try matte black, warm white, olive green, terracotta, or brushed gold.
If the original frame has carved details, dry-brush a lighter color over raised edges after painting. This highlights texture and makes an inexpensive frame look vintage.
Creative Frames Using Everyday Materials
Some of the most memorable handmade photo frames come from ordinary materials. These projects are good for renters, parents crafting with kids, or anyone who wants a quick weekend decor update.
Washi Tape Gallery Frames
Washi tape is ideal for lightweight prints, postcards, Polaroids, and dorm room walls. Create a faux frame directly on the wall by placing tape around each photo. Use solid black tape for a clean gallery look, metallic tape for glam style, or patterned tape for kids’ rooms and craft corners.
This idea works best for low-traffic walls because tape can lift over time. Use removable poster tape behind the photo, then washi tape as decorative border. It is budget-friendly and renter-friendly when used carefully on properly cured paint.
Cardboard and Fabric Frames
Cardboard frames are light, cheap, and surprisingly attractive when covered with fabric. Cut two rectangles: one full backing piece and one front piece with a window opening. Wrap the front piece in linen, denim, velvet, cotton, or leftover upholstery fabric. Glue fabric edges to the back, then attach the front to the backing along three sides so the photo can slide in.
This project is great for nursery prints, seasonal decor, or small desk frames. Add ribbon, twine, or a fold-out cardboard stand depending on where you want to display it.
Pressed Flower Frame
Pressed flowers turn simple frames into delicate keepsakes. Use a floating glass frame or clear acrylic sheets. Arrange dried flowers around the photo or create a botanical border between two transparent layers. Ferns, baby’s breath, violets, pansies, and small leaves work especially well.
Keep this frame away from direct sunlight because flowers may fade. For wedding photos, graduation portraits, or spring decor, this design adds soft personal meaning.
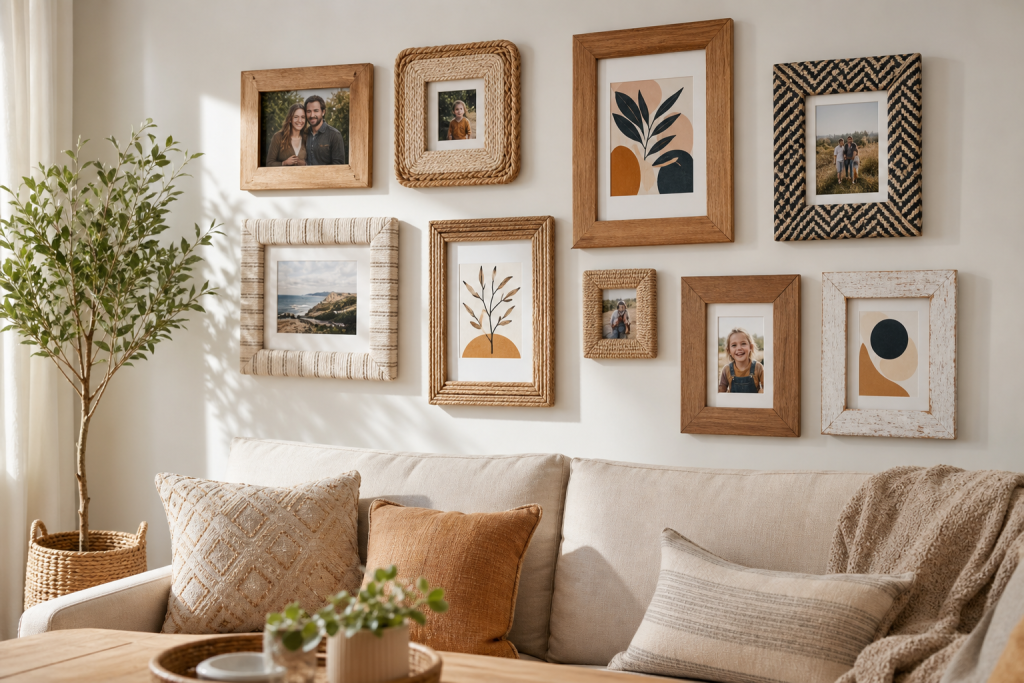
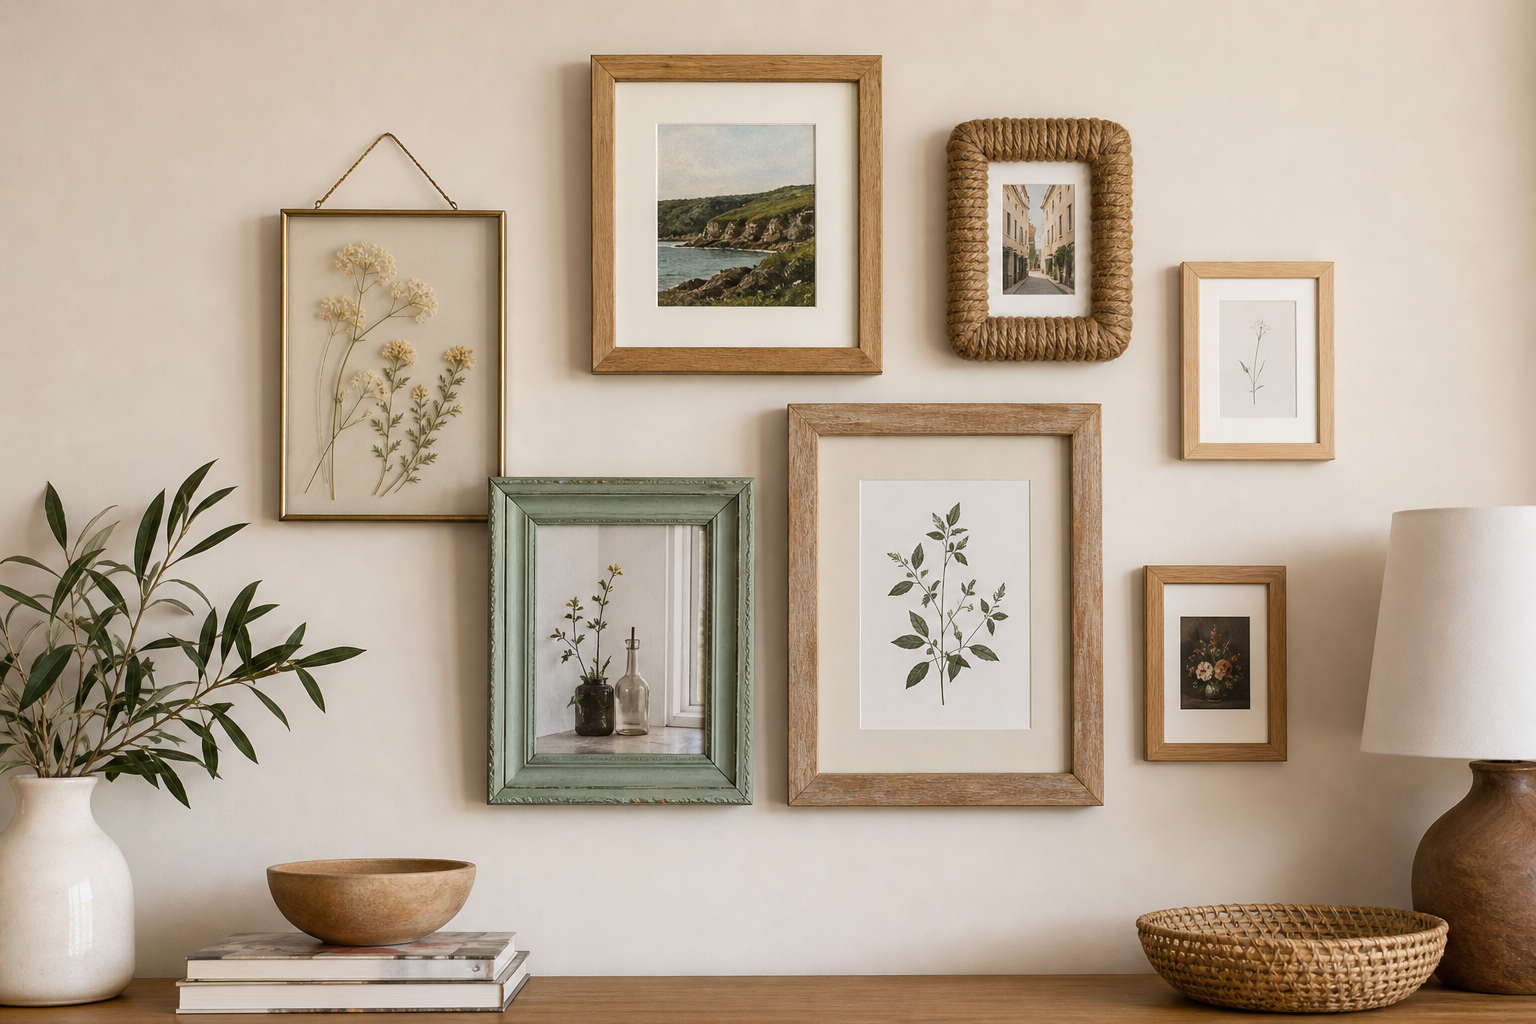
DIY Gallery Wall Ideas with Handmade Frames
Detailed illustration
A gallery wall can look intentional even when every frame is different. Start with a layout plan on the floor. Place the largest piece slightly off center, then build around it with smaller frames. Mix family photos, travel prints, kids’ art, small mirrors, and typographic quotes.
For a cohesive handmade gallery wall, choose one anchor color. For example, use black accents on every frame, repeat natural wood tones, or add small brass details. Keep spacing between frames consistent, usually two to three inches for a tight arrangement and four to six inches for a more relaxed look.
If you rent or prefer not to make many holes, use removable picture hanging strips rated for the weight of each frame. Heavier wood picture frame projects should use proper wall anchors or studs, especially in hallways or above furniture.
Budget-Friendly Frame Makeovers
Buying new custom frames in the U.S. can get expensive quickly, especially for oversized prints. Makeovers are often cheaper and more sustainable. Yard sales, estate sales, dollar stores, Facebook Marketplace, and thrift stores are excellent sources for frames with good bones.
Gold Leaf Accent Frame
Gold leaf or metallic rub-on wax can transform plain frames into statement pieces. Apply it to corners, carved details, or thin inner edges. The result pairs beautifully with art prints, formal portraits, and vintage photographs. Use a light hand so the finish looks elegant rather than overly shiny.
Coastal Rope Frame
For beach houses, bathrooms, or lake cabin decor, wrap a frame in jute rope or cotton cord. Start at one corner, glue small sections as you go, and keep rows tight. Add shells only if they fit the room style; too many extras can make the piece look like a souvenir instead of decor.
Scrapbook Paper Mat Upgrade
Changing the mat can refresh a frame without touching the outside. Cut scrapbook paper, handmade paper, or textured cardstock to fit behind the photo opening. Subtle patterns work best because they support the photo instead of competing with it. This easy upgrade is useful for seasonal decorating and holiday displays.
Kid-Friendly Handmade Photo Frames
Picture frame crafts are meaningful projects for families. They work well for Mother’s Day, Father’s Day, grandparents’ gifts, teacher appreciation, and summer break activities. Choose safe supplies, avoid sharp glass for young children, and use washable paints when possible.
Popsicle Stick Frame
Popsicle sticks are classic because they are simple and sturdy. Glue sticks into a square or rectangle, paint them, then decorate with buttons, stickers, foam shapes, or small wooden letters. Add a magnet to the back for fridge display or attach ribbon for hanging.
Button Border Frame
Old buttons create playful texture. Paint a basic frame, then glue buttons around the border in one color family. White and cream buttons look vintage, bright colors feel cheerful, and black buttons create a graphic modern look. Use strong glue and let it cure fully before hanging.
Tips for Making DIY Frames Look Professional
Related context illustration
Small details separate homemade from handmade. Measure twice before cutting. Keep corners clean. Use acid-free materials around valuable photos. Clean glass before reassembling the frame. If paint looks streaky, add another thin coat instead of one thick coat. Let glue, stain, and sealant dry completely before inserting artwork.
Scale also matters. A tiny photo in a large frame needs a mat or border to look intentional. A busy photo usually looks better in a simple frame. A simple black-and-white print can handle a textured or colorful frame. When in doubt, let the image lead the design.
Best rule: choose a frame that supports the memory, not one that steals attention from it.
Supplies Worth Keeping in a Frame-Making Kit
A basic kit makes future projects faster. You do not need professional woodworking tools for most diy picture frame ideas, but a few reliable supplies help produce cleaner results.
-
Wood glue or strong craft glue
-
Utility knife and cutting mat
-
Metal ruler or measuring tape
-
Sandpaper in medium and fine grit
-
Acrylic paint, stain, or spray paint
-
Picture hanging hardware or removable strips
-
Acid-free tape or photo corners
-
Cardboard, mat board, or thin plywood backing
Common Mistakes to Avoid
Avoid using wet glue directly on printed photos because it can ripple or stain the image. Do not hang heavy frames with weak adhesive hooks. Avoid placing delicate paper frames in humid bathrooms or sunny windows. Be careful with pallet wood; some pallets are chemically treated and not suitable for indoor decor. When working with glass, wear gloves and check edges for chips.
Another common mistake is overdecorating. Extra beads, shells, stickers, and paint effects can hide the photo. Choose one main decorative feature and keep the rest simple.
Conclusion
DIY frames are one of the easiest ways to make a home feel personal. From reclaimed wood and painted thrift finds to pressed flowers, fabric-covered cardboard, rope details, and kid-friendly popsicle stick designs, there is a project for every skill level and budget. Start with one photo you love, choose materials that match your room, and build a frame that gives the memory a place of honor.